Application Note
Terms
ADAS: Advanced driver assistance system
AI: Artificial intelligence
API: Application programming interface
CMF: CalAmp mobile framework
CTC: CalAmp Telematics Cloud
DVR: Digital video recorder
EDVR: Enhanced digital video recorder
GPS: Global positioning system
IVT: iOn Vision telematics
LMU: Location messaging unit
OBD: Onboard diagnostics
PEG: Programmable event generation (PEG script)
PEG2: Second generation of programmable event generation (PEG2 script)
iOn Vision Overview
The CalAmp iOn Vision solution employs two cameras to capture video and a Wi-Fi-enabled LMU for connectivity to the CTC platform. The main camera is a wide-angle front-facing camera mounted to the windshield, and the secondary camera faces inside the vehicle. The iOn Vision camera supports DVR and can capture EDVR events, triggered either by the camera or the LMU. Captured EDVR videos are uploaded to CTC at the end of every trip, and DVR data is available upon request from the CTC API. CTC provides a suite of Video APIs to access EDVR events or request DVR segments from trips.
Supported Devices
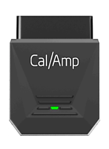
LMU-3240, App ID: 1011, Firmware: 2.4.1.5.0.7, PEG2
- OBD plug-in
- Vehicle diagnostics
- Onboard Wi-Fi
- No external inputs or outputs
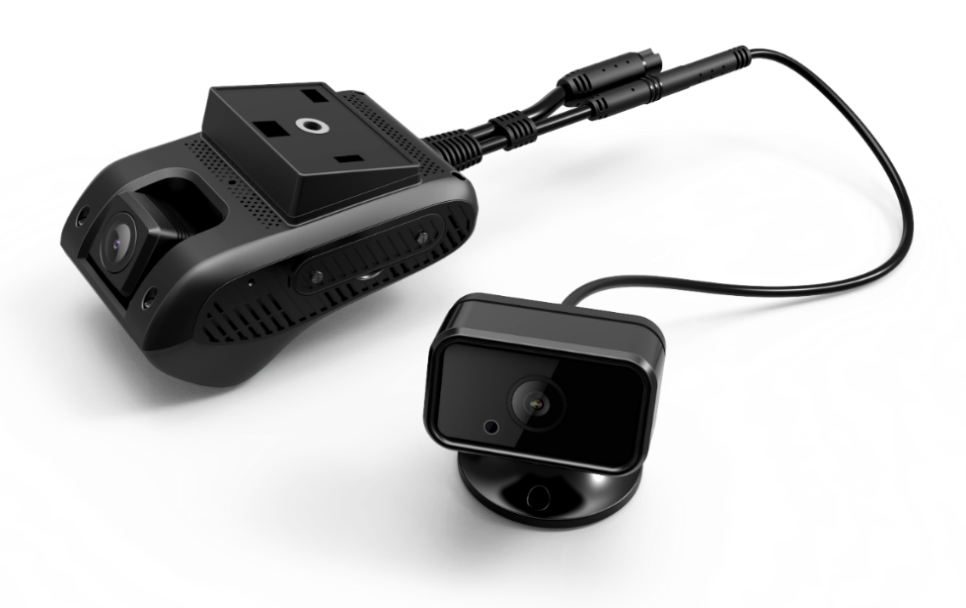
Camera Hardware
Main camera: Windshield mounted, wide-angle (140°), front facing
Secondary camera: Dash mounted, high contrast, driver facing
SOS button: Dash button to trigger an immediate SOS EDVR event
OBD extension cable: Used for vehicle connection for the LMU; provides a power connection to the camera power harness
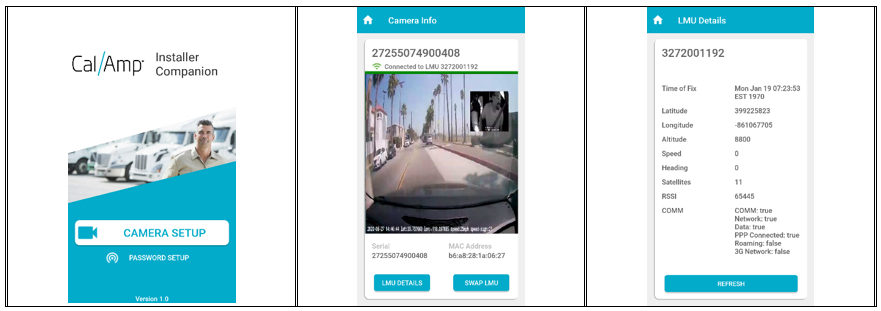
Android Installer App
The CalAmp iOn Vision Installer Companion app is available in the Google Play Store; it enables an installer to align the camera direction on the windshield by displaying a live view from the camera. The app also provides real-time data for GPS position and network status.
iOn Vision Camera Operation
The iOn Vision solution is based on trips that vehicles make. A trip is started when the LMU detects that its vehicle's ignition is on and ends when the ignition transitions to off. The LMU provides the status of the ignition to the camera using the CMF protocol over a secure Wi-Fi connection. Here's a basic rundown of how this works:
-
The vehicle ignition turns on.
• The LMU wakes up and start broadcasting Wi-Fi.
• The camera detects the Wi-Fi and connects. -
The vehicle is operating.
• The camera remains connected to Wi-Fi.
• The camera and LMU communicate using the CMF protocol.
• The camera records DVR throughout the trip.
• The camera and the LMU trigger EDVR events for detected violations. -
The vehicle ignition turns off.
• The LMU detects that the vehicle ignition has turned off.
• The camera detects that the ignition is off and uploads any EDVR events captured during the trip.
• The LMU stops broadcasting Wi-Fi and enters low-power sleep mode.
Videos
Videos are marked with timestamp, position, and speed data. The quality and duration of the video are determined by the PEG script for EDVR events and by API requests for DVR video.

Enhanced Digital Video Recorder
An EDVR event is a video recording captured because of a camera violation or an LMU event. The LMU can generate EDVR events based on PEG triggers for driver behavior violations such as harsh acceleration and idling. The camera uses AI to detect the following violations that generate EDVR events:
- Tailgating: The vehicle is traveling too closely to the object in front of it.
- Speeding: The vehicle is traveling faster than the posted speed limit.
- Stop sign violation: A stop sign was detected, and the vehicle did not fully stop.
- Max speed violation: The vehicle is driving faster than the maximum allowed speed.
- Lane drift: The vehicle is not traveling within the lane markings of the road.
- SOS button: The driver has pressed the emergency dash button.
Digital Video Recorder
During vehicle trips, the camera records DVR data to its memory. When the storage limit is reached, the oldest video data is overwritten with the latest video data. DVR data is not uploaded to CTC until it is requested; you can request time segments of the video using the CTC API, and it can be compressed into time-lapse video. DVR videos can be retrieved via the API after the upload has completed.
LMU Configuration
The LMU firmware contains the iOn Vision microservice, which is enabled over the air. After the microservice is enabled, you can use the following PEG triggers and actions to capture EDVR events.
When the PEG script performs the action to capture video, it also generates an event report to the inbound server with a matching event code. This pairs the video in CTC to the GPS data from the LMU's event report to the inbound server.
PEG2 Procedure for EDVR
There are two ways the PEG script can generate EDVR video events: The camera can notify the script of a detected violation, or the script can generate an EDVR video event based on a PEG trigger.
Camera-Detected EDVR Procedure
- The camera notifies the PEG script of a camera violation with PEG trigger 110 (PEG trigger 110 with modifier 1 being the event ID — the camera violation code).
- The PEG script uses PEG action 201 to upload the EDVR event.
- The PEG script sends a matching event report to the inbound server.
PEG-Triggered EDVR Procedure
- The PEG script detects a reason to generate an EDVR video event, such as harsh acceleration, long idle, or the vehicle operating outside its allowed schedule.
- PEG action 201 requests that the EDVR event upload to the camera.
- The PEG script sends an event report to the inbound server.
PEG2 Triggers
CMF event, PEG trigger 110, camera-generated event
The camera informs the LMU of a camera event or violation.
These are the two modifiers:
- M0: The event ID
- M1: The service type and device index
M0: Event ID | M1: Service Type and Device Index |
|---|---|
32: Trip started 33: Trip ended 34: Camera error 35: Buffer 36: Tailgating violation 37: Speeding violation 38: Stop sign violation 39: Lane drift 40: Max speed exceeded 41: SOS/panic button | Bits 0–7: Service type Bits 8–15: Device index |
PEG2 Actions
CMF action report, PEG action 201, upload EDVR video
These are the three modifiers:
- M0: The event code (the reason for the event)
- M1: The service type and device index
- M2: The event ID, which selects the type of video to upload
M0: Event Code | M1: Service Type and Device Index | M2: Event ID |
|---|---|---|
The event code should match the code sent to the inbound server. | Bits 0–7: Service type Bits 8–15: Device index | 0: Default video profile |
Modifier Definitions
- Service ID: A modifier used in PEG action 203 and PEG2 action 201. For the iOn Vision camera service, the ID will always have a value of 4.
- Device index: A modifier used in PEG action 203 and PEG2 action 201. With a single camera attached, the device index will be 0.
- Event ID: A modifier for PEG action 202 and PEG2 action 201. For LMU-generated events, the event ID determines the quality and duration of the video. For camera-generated events, the event ID identifies the type of camera event detected.
The resolution and duration for these events are the default values. You can update the video profile settings and camera event settings in the confg.json file.
LMU-Generated Event IDs
Event ID | Description | Resolution | Total Duration |
|---|---|---|---|
0 | Default video profile | 640 x 360 | 15 seconds |
1 | Video profile 1 (high quality, short duration) | 1280 x 720 | 15 seconds |
2 | Video profile 2 (high quality, long duration) | 1280 x 720 | 24 seconds |
3 | Video profile 3 (low quality, short duration) | 320 x 180 | 15 seconds |
4 | Video profile 4 (low quality, long duration) | 320 x 180 | 24 seconds |
5 | Video profile 5 (custom) | 640 x 360 | 35 seconds |
6 | Image | 640 x 360 | N/A |
Camera-Generated Event IDs
Event ID | Description | Resolution | Total Duration |
|---|---|---|---|
32 | Trip started | N/A | N/A |
33 | Trip ended | N/A | N/A |
34 | Camera error | N/A | N/A |
35 | Buffer | N/A | N/A |
36 | Tailgating violation | 1280 x 720 | 15 seconds |
37 | Speeding violation | 1280 x 720 | 15 seconds |
38 | Stop sign violation | 1280 x 720 | 15 seconds |
39 | Lane drift | 1280 x 720 | 15 seconds |
40 | Max speed exceeded | 1280 x 720 | 14 seconds |
41 | SOS/panic button | 1280 x 720 | 14 seconds |
Camera Configuration
The camera has configuration options to enable camera features, specify event thresholds, and set video profiles. These settings are listed in the iov-config.json file on the camera, which can be updated over the air using PULS, with options for the following:
- Setting MaxSpeedLimit for speeding violations
- Setting the video resolution for individual EDVR event types
- Enabling and disabling camera audio per violation
- Setting the allowance threshold for tailgating sensitivity
- Setting the maximum allowed speed for stop sign violations
- Setting the allowance for a speed over the posted speed limit before it's reported as a violation
CalAmp Telematics Cloud
The camera will upload EDVR events to CTC at the end of a trip, whereas DVR data is stored locally in the camera memory. The CTC API enables you to retrieve EDVR videos that have been uploaded and request DVR captured during trips. After the DVR data has been requested and uploaded, the videos will be available in CTC. The CTC requests for DVR segments have options to control the quality, duration, and frame rate that can reduce the overall size of the videos.
iOn Vision Camera Portal
To assist with evaluation of the iOn Vision solution and jumpstart integration with the CTC API, CalAmp has created a web application that pulls video events from CTC where they can be viewed or downloaded. You can also view the video event JSON data as it would be received from the CTC API. To use this application, log in with the credentials and API key for the CTC account. After you are logged in, you can view recent EDVR events and request DVR from trips.
URL: https://ionvision-portal.calamp.com
Use the CTC account's login credentials.
CTC API Features for Video
The Video Services API in CTC provides for the following:
- Authentication for login and logout
- Requests for all EDVR events for a device or an account
- Requests for DVR video from trips
- Requests for higher-resolution video for EDVR events
- Searches for video events
Base URL ({baseUrl}): https://connect.calamp.com/api
Authentication
To authenticate through the API, send an HTTP POST with the following parameters. The API will respond with an authToken that needs to be included with any subsequent requests to the API. The authorization token will expire if it is unused for 30 minutes or if you use the logout API method.
To log in and authenticate:
- Use URL
{baseUrl}/login. - Send an HTTP POST with the following parameters:
x-app-key = appkey
Headers = {“Content-Type”: “application/json”}
Body = {username: “username”, password: “password”}
To log out, use URL {baseUrl}/logout.
Video Service APIs
The Video Service APIs use the following headers for every request:
Headers:
Authorization token = authToken from the authentication response
x-app-key = appkey for the CTC account
x-app-version (optional) = appVersion
GET enhanced video events by device ID: Retrieve available EDVR events for the specified device.
URL = {baseUrl}/videos/events/devices/esn/{{deviceEsn}}
GET enhanced video events by account ID: Retrieve available EDVR events for the devices in the specified account ID.
URL = {baseUrl}/videos/events/accounts/{{accountId}}
POST EDVR upload request: Request a higher-resolution video of an EDVR video event.
URL = {baseUrl}/videos/edvr/request
POST DVR upload request: Register an upload request for a DVR video segment.
URL = {baseUrl}/videos/dvr/request
GET retrieve DVR: Retrieve DVR video events that have been uploaded from a successful DVR upload request.
URL = {baseUrl}/videos/dvr/devices/esn/{deviceEsn}
GET DVR requests by upload request ID: Return the DVR request details for the given uploadRequestId.
URL = {baseUrl}/videos/dvr/uploadrequests/{uploadrequestid}
POST DVR search: Search for uploaded DVR videos.
URL = {baseUrl}/videos/dvr/search
Here are the properties that can be searched:
createdOn (date[]): yyyy-MM-dd'T'HH:mm:ss.SSSZgroups (list[])accountId (long[])avlEventUuid (uuid[])appMessageUuid (uuid[])avlEventTime (date[]): yyyy-MM-dd'T'HH:mm:ss.SSSZid (long[])appmsgEventTime (date[]): yyyy-MM-dd'T'HH:mm:ss.SSSZdeviceId (string[])
Updated 3 months ago